/// LSU EE 3755 -- Spring 2002 -- Computer Organization
//
/// Verilog Notes 6 -- Procedural Code & Behavioral Modeling
/// Under Construction, Mostly Complete
// Time-stamp: <6 March 2002, 14:47:37 CST, koppel@sol>
//
// Possible Changes and Additions
//
// More illustrations of synthesized hardware.
// More examples, including one with a state machine.
// Testbench for population count modules.
/// Contents
//
// Procedural Code Overview
// Procedural Code Basics (initial,always,begin,end,#,$display)
// More Procedural Code Basics (always)
// Variables (reg, integer, etc)
// Event Control (@)
// Synthesis of Procedural Code (Three Forms)
// Form 1 - Combinational Logic and Level-Triggered Reg
// Form 2 - Edge-Triggered Flip-Flops
// Synthesis of Forms 1 and 2 (Summary of Classes)
// Synthesis: Assignments Class, some FormEnd Class cases.
// Syntax and Simulation of if else
// Synthesis of Conditional Class (if/else)
// Syntax and Simulation of case
// Synthesis of Conditional Class (case, if/else chains)
// Syntax and Simulation of for, while, repeat
// Synthesis of Iteration Class (for, while, repeat)
// Ripple Adder: Combinational v. Sequential
// Miscellaneous Examples
/// References
//
// :P: Palnitkar, "Verilog HDL"
// :Q: Qualis, "Verilog HDL Quick Reference Card Revision 1.0"
// :H: Hyde, "Handbook on Verilog HDL"
// :LRM: IEEE, Verilog Language Reference Manual (Hawaii Section Numbering)
// :PH: Patterson & Hennessy, "Computer Organization & Design"
// :LSS: Exemplar Logic, LeonardoSpectrum HDL Synthesis
////////////////////////////////////////////////////////////////////////////////
/// Procedural Code Overview
// :P: 7, 7.1, 7.1.1
// :LRM: 9.1
/// Structural Model
//
// A description of hardware in terms of an interconnection of simpler
// components. The Verilog examples presented in class up to this
// point have been structural models.
/// Behavioral Model
//
// A description of what hardware does. That is, a description of
// what the outputs should be given some input.
//
// Written using procedural code.
/// Procedural Verilog Code
//
// Used for writing behavioral models.
//
// Like a Simple C Program:
// Statements executed in program order.
//
// Unlike a Simple C Program
// Multiple pieces of code can run concurrently.
// Need to think about how code starts and pauses.
// Time (simulated) part of language.
/// Activity Flow (within procedural code)
//
// The place execution has reached at a particular time.
//
// A Verilog description can have many activity flows.
// Each "initial" and "always" (see below) block has
// its own activity flow.
// How Code Starts in an ordinary C Program
// Starts with call to "main."
//
// How Procedural Code Starts in Verilog
// Code in all "initial" and "always" blocks (see below)
// starts at t=0.
/// Reminder
//
// Pay attention to how simulated time is handled.
//
// Remember that several pieces of procedural code can execute
// concurrently, and so several activity flows are concurrently
// advancing.
////////////////////////////////////////////////////////////////////////////////
/// Procedural Code Basics (initial,always,begin,end,#,$display)
// :P: 7.1, 7.1.1, 7.1.2 initial, always
// :P: 7.7, 7.7.1 begin/end. Parallel blocks not covered, but they're fun.
// :P: 7.3, 7.3.1 Delay (#)(more general than covered in the course.)
// :P: 3.3.1 System tasks, including $display.
// :H: 2.1 Covers lots of other stuff in broad introduction.
// :H: 2.9.1 Delay (#)
// :LRM: 9.9 initial, always (tasks and functions not covered).
// :LRM: 9.8 begin/end
// :LRM: 9.7 Delay (#) (Under delay control)
// :LRM: 14.1 $display
// :Keywords: initial, always, begin, end, #, $display, $stop
// Procedural Code
//
// Starts with either "initial" or "always"...
// ... followed by a single statement ...
// ... or a begin / end block [or a fork/join block].
//
// Details follow example.
// :Example:
//
// A module using procedural code to print simple messages.
module my_first_procedural_module();
// It's what it looks like. Integers will be covered soon.
integer i;
initial // Indicate start of procedural code.
// Activity flow (execution) starts at t=0.
begin // begin/end used to bracket code.
// Lines below execute sequentially, like an ordinary program.
i = 0;
$display("Hello, EDA World!! BTW, i=%d t=%t", i, $time);
i = 1;
$display("Hello, EDA World!! BTW, i=%d t=%t",i,$time);
end
endmodule
/// Specifying Procedural Code: initial, always
//
// :Syntax: initial STATEMENT;
//
// Start activity flow (start executing) with STATEMENT at t=0.
// STATEMENT may finish at t=0 or later (depending on what it is).
//
// Note: STATEMENT may be a single statement, a begin/end block, [or a
// fork/join block].
//
//
// :Syntax: always STATEMENT;
//
// Start activity flow (start executing) with STATEMENT at t=0.
// STATEMENT may finish at t=0 or later (depending on what it is).
// When STATEMENT finishes start it again. (Loop infinitely.)
/// Procedural [Sequential] Block: begin, end
//
// :Syntax: begin STATEMENT1; STATEMENT2; ... end
//
// Used to bracket statements. begin, end, and statements between
// treated as a statement.
//
// The entire begin/end block below is treated as a single statement.
// :Sample: begin a=0; b=2; end
//
// :Sample: initial begin clk = 0; x = 3; end
/// System Task: $display
//
// :Syntax: $display(FORMAT,EXPR1,EXPR2,...);
//
// Used to display messages on simulator console. Similar to C
// printf. FORMAT specifies what text to print and, using /escape
// sequences/, how expressions should be formatted. EXPR1, EXPR2, etc
// are evaluated and their values printed.
//
// Format Escape Sequences
//
// Start with a % and are followed by a format character.
// Format characters: %d (decimal), %h (hex), %o (octal), %b (binary)
// %c (character), %s(string), %t(time), ...
//
// See module for examples.
/// System Task: $stop
//
// :Syntax: $stop;
//
// Stop simulator. Typically used at the end of a testbench or where
// the testbench discovers an error.
/// Procedural Delay
//
// :Syntax: # NUM;
//
// Delay execution NUM time units. See behavioral_2 example.
//
// :Syntax: # ( EXPR );
//
// Delay by value of EXPR;
//
// :Syntax: # NUM STATEMENT;
//
// Delay execution NUM time units then execute STATEMENT. This is
// equivalent to: begin # NUM; STATEMENT; end
//
// :Syntax: # ( EXPR ) STATEMENT;
//
// Delay by value of EXPR then execute STATEMENT. This is equivalent
// to: begin # (EXPR); STATEMENT; end
// :Example:
//
// Procedural code using initial. Code below starts at t=0, and
// because there are no delays, finishes at t=0.
//
// Question: Reg x can be viewed using the wave window and the console
// (where the display messages appear). With respect to x below
// there's an important difference between the two. What is it?
module behavioral_1(x);
output x;
reg [7:0] x;
initial
// Activity flow starts here at t=0.
// Procedural Code Starts Here
begin
x = 1;
$display("Hello, x=%d, t=%t",x,$time);
x = 2;
$display("Hello, x=%d, t=%t",x,$time);
x = 3;
$display("Hello, x=%d, t=%t",x,$time);
end
endmodule
// Simulator Output
//
// # Hello, x= 1, t= 0
// # Hello, x= 2, t= 0
// # Hello, x= 3, t= 0
// :Example:
//
// An example of behavioral code using delays. The initial block
// starts at t=0 and finishes at t=3.
module behavioral_2(x);
output x;
reg [7:0] x;
initial
begin
x = 1;
$display("Hello, x=%d, t=%t",x,$time);
#1;
x = 2;
$display("Hello, x=%d, t=%t",x,$time);
#1;
x = 3;
$display("Hello, x=%d, t=%t",x,$time);
#1;
end
endmodule
// Simulator Output
//
// # Hello, x= 1, t= 0
// # Hello, x= 2, t= 1
// # Hello, x= 3, t= 2
// :Example:
//
// Use of two initials in a module. Both start execution at t=0.
module behavioral_3(x);
output x;
reg [7:0] x;
// Initial block A
initial
// Activity flow starts here at t=0.
begin
x = 1;
$display("Hello, x=%d, t=%t",x,$time);
#10;
x = 2;
$display("Hello, x=%d, t=%t",x,$time);
#10;
// The two statements below and in the next initial block
// execute at t=20. There is no way to tell for sure whether
// the final value of x will be 3 or 30.
x = 3;
$display("Hello, x=%d, t=%t",x,$time);
#10;
end
// Initial block B
initial
// Activity flow starts here at t=0.
begin
#5;
x = 10;
$display("Hello, x=%d, t=%t",x,$time);
#10;
x = 20;
$display("Hello, x=%d, t=%t",x,$time);
#5;
// The two statements below and the two in the previous
// initial block execute at t=20. There is no way to tell for
// sure whether the final value of x will be 3 or 30.
x = 30;
$display("Hello, x=%d, t=%t",x,$time);
#10;
end
endmodule
// t 0 5 10 15 20
// A x=1 x=2 x=3
// B x=10 x=20 x=30
//
// Both blocks execute at t=20. One of them will execute before the
// other but there is not way to predict which one. (The Verilog
// language does not specify which should execute first; though a
// particular implementation of Verilog may be consistent one way the
// behavior of other implementations can be different.)
//
// Simulator Output:
//
// # Hello, x= 1, t= 0
// # Hello, x= 10, t= 5
// # Hello, x= 2, t= 10
// # Hello, x= 20, t= 15
// # Hello, x= 3, t= 20
// # Hello, x= 30, t= 20
// :Example:
//
// The module below is a behavioral description of an xor gate that
// doesn't work. Why not?
module this_xor_gate_doesnt_work(x,a,b);
input a, b;
output x;
reg x;
initial
begin
x = a ^ b;
end
endmodule
// Because it sets the output to a xor b only once, at t=0. Inputs a
// and b might change after t=0, but x won't.
// :Example:
//
// Testbench for the xor gate above.
module demo_xor();
reg a, b;
wire x;
this_xor_gate_doesnt_work x0(x,a,b);
integer i;
initial
for(i=0; i<4; i=i+1)
begin
a = i[0];
b = i[1];
#1;
end
endmodule
////////////////////////////////////////////////////////////////////////////////
/// More Procedural Code Basics (always)
// :P: 7.1.2 always
// :LRM: 9.9 initial, always (tasks and functions not covered).
// :Keyword: always
//
// :Syntax: always STATEMENT;
//
// Execute STATEMENT at t=0.
// When it completes execute it again. And again, and again,...
/// Use of initial and always
//
// Use of initial
// Testbench code.
// Initializing modules for simulation, NOT for synthesis.
// :Example:
//
// A simple always demo. Message will be printed endlessly
// as simulated time advances.
module shouldnt_do_this();
always
begin
$display("This is an infinite loop.");
#10;
end
endmodule
// :Example:
//
// An example of how NOT to use always. It starts at t=0 and loops
// endlessly without advancing time. Therefore the code in the
// initial block never gets past the #1 delay.
module never_do_this();
always
begin
$display("This is an infinite loop too.");
end
initial
begin
#1;
$display("The simulator will never get this far.");
end
endmodule
// :Example:
//
// An example of how to use always. The code in the initial block
// initializes the clock to 0. The code in the always block inverts
// it every ten cycles. This sort of code is used by testbenches, not
// modules to be synthesized.
module clock_generator(clk);
output clk;
reg clk;
initial clk = 0;
always
begin
#10;
clk = ~clk;
end
endmodule
// :Example:
//
// Another proper use of always. This generates a clock that is high
// for 90% of the time. (The clock above was a square wave.)
module another_clock_generator(clk);
output clk;
reg clk;
always
begin
clk = 0;
#1;
clk = 1;
#9;
end
endmodule
////////////////////////////////////////////////////////////////////////////////
/// Variables (reg, integer, etc)
// :P: 4.2.3 Port connection rules.
// :P: 3.2.3, 3.2.5 Registers (Variables), variable types.
// :H: 2.4.1, 2.4.2 Variable data types. (Under abstract and physical.)
// :LRM: 3.2 Difference between nets and registers (variables)
// :LRM: 3.9 Variable types: integers, real, time, [realtime].
// :LRM: 12.3 See "Port connection rules."
/// Variable Types
//
// Hold values, unlike wires (nets)
// Variable Types
//
// reg: Holds physical values. (Vector of 0, 1, x, z)
// Declared with a specific number of bits.
// Unsigned integer (or x or z).
//
// integer: Signed integer.
// Usually 32 bits (based on host machine).
//
// real: Floating-point number. Usually IEEE 754 double.
//
// time: At least a 64-bit integer.
// For holding simulated time.
module var_usage();
reg [7:0] r;
integer i;
real f;
time t;
initial
begin
r = -5; // Value in reg interpreted as unsigned ...
i = r; // ... so i gets a positive value even though ints are signed..
f = 1.0 / i; // Take reciprocal of i.
t = $time; // Get current time.
// Display values in appropriate formats.
$display(" r = %h, i = %d, f = %f, t = %t",r,i,f,t);
end
endmodule
/// Variable and Net Assignment Rules
//
// Nets and variables are not interchangeable. Here is how they can be used:
// Letters refer to example below.
//
// Note: net types: wire, [others not covered].
// variable types: reg, integer, real, time, [others not covered].
//
// A:Procedural Code
// Can assign to variables.
// Cannot assign to nets.
//
// B:Continuous Assignment (assign)
// Left-hand side must be a net.
// Cannot be used to assign variables. [Not covered: can be used in proc code.]
//
// C:Instantiation Input Connection
// Can use net, variable, or expression.
//
// D:Instantiation Output Connection
// Must use net. (Cannot use variable.)
//
// E:Module Input Port
// Must use net. (Cannot use variable.)
//
// F:Module Output Ports
// Can use nets or variables.
// :Example:
//
// Examples of how nets and registers used.
module reg_v_net();
reg [7:0] x, y;
wire [7:0] a, b;
// B: Continuous assignment to a net.
assign a = x;
// B: The commented-out line below would be an error because reg's cannot
// be assigned using assign.
// assign y = x;
initial
begin
// A: Assignment to a variable.
x = 1;
// A: The commented-out line below would be an error because
// net's cannot be assigned in procedural code.
// b = 1;
end
endmodule
// :Example:
//
// Examples of how nets and registers used for ports and connections.
module port_example_1();
wire s, co;
// D: Commented-out line below would be an error because variables
// (including reg's) cannot connect to instantiation output
// connections, in this case sum and carry out.
// reg s, co;
// C: Instantiation input connections (inputs to an instantiated
// module, bfa_implicit.b1 below) can be either reg's or net's.
reg a, b;
// C: Input connections to instantiated module are regs (a,b) and
// an expression (1'b0).
// D: Output connections are nets (s,co), and cannot be variables (regs).
bfa_implicit b1(s,co,a,b,1'b0);
initial
begin
#1; a = 0; b = 0;
#1; a = 0; b = 1;
#1; a = 1; b = 0;
#1; a = 1; b = 1;
#1;
end
endmodule
// :Example:
//
// Additional examples of how to use variables and nets.
module port_example_2(x,s,a);
// E: Module inputs must be wires. (The default.)
input a;
// F: Module outputs can be either variables or nets.
// Here x is a variable (reg) and s is a net (wire, by default).
output x, s;
reg x;
// E: The commented out line below would be an error since module inputs
// cannot be variables.
// reg a;
wire co;
// D: Commented-out line below is an error because variables
// (including reg's) cannot connect to output ports, in this case
// sum and carry out.
// reg co;
// C: Input connections to an instantiated module (bfa_implicit.b1
// below) can be either reg's or net's. Here, net type wire is
// used.
wire b, ci;
integer i;
assign b = i[0];
assign ci = i[1];
bfa_implicit b1(s,co,a,b,ci);
initial
begin
x = 1; // x is not a very useful output.
#1; i = 0;
#1; i = 1;
#1; i = 2;
#1; i = 3;
#1;
end
endmodule
////////////////////////////////////////////////////////////////////////////////
/// Event Control (@)
// :P: 7.3.2
// :H: 2.9.2
// :LRM: 9.7 (Look under event control)
// An /event control/ statement pauses the execution of the procedural
// code in which it appears until the specified event occurs. Other
// procedural code and simulation activities are not affected.
// The general use of event control statements will be briefly
// described here. Specific uses (for Form 1 and Form 2) will be
// described in later sections. The general uses will not be used
// much in this class.
// :Syntax: @( EXPR ) STATEMENT;
//
// Evaluate EXPR and resume execution starting with STATEMENT when
// value of EXPR changes.
// :Syntax: @( EXPR1 or EXPR2 or... ) STATEMENT;
//
// Evaluate EXPR1, EXPR2, ... and resume execution starting with
// STATEMENT when the value of any of the EXPR change.
// :Syntax: @( posedge EXPR ) STATEMENT;
//
// Resume execution starting with STATEMENT when EXPR changes from 0
// to anything or from anything to 1.
// :Syntax: @( negedge EXPR ) STATEMENT;
//
// Resume execution starting with STATEMENT when EXPR changes from
// anything to 0 or from 1 to anything.
// :Syntax: @( EDGE1 EXPR1 or EDGE1 EXPR2 or ... ) STATEMENT;
//
// EDGE1 can be posedge, negedge, or nothing.
// Resume execution at STATEMENT when any of the EXPR change to
// the specified value (nothing, which means just EXPRx, means any change).
// The event controls can be used anywhere a statement can go. In
// practice they are almost always used right after "always," which is
// the way they will be covered in the following sections. The more
// general use will not be covered any further in class, those who are
// curious can visithttp://www.ece.lsu.edu/v/2001/l060.html
////////////////////////////////////////////////////////////////////////////////
/// Synthesis of Procedural Code (Three Forms)
// :P: 14.3.3 Covers a few bits and pieces.
// :LSS: 7 Does not follow approach used here. Provides additional details.
/// Synthesizable Definition
//
// A property of an HDL description indicating that a synthesis program
// will correctly synthesize it. Whether a description is synthesizable
// depends upon the synthesis program used.
//
// Not all procedural code is synthesizable.
//
// These notes are for a particular synthesis program, Leonardo
// Spectrum 2000. Other contemporary mid-line synthesis programs are
// similar but not identical.
/// Note
//
// In these notes flip-flop and registers are used interchangeably.
// (A register is a collection of flip-flops meant to store data. A
// one-bit register is equivalent to a flip-flop as used here.)
/// The Three Synthesizable Forms
//
// An always block is synthesizable if it is in one of three forms:
//
// Form 1
// Synthesizes into combinational logic and level-triggered flip-flops.
//
// Form 2
// Synthesizes into edge triggered flip flops.
//
// Form 3
// Synthesizes into a state machine. Not fully vendor-supported
// and not covered here.
//
// The form applies to a procedural block starting with "always."
// A module can have any number of such blocks, each block can
// be in any form.
//
// Blocks starting with initial are not synthesizable.
/// Synthesis of Forms 1 and 2
//
// Okay, so what will the hardware look like?
//
// See the Synthesis of Forms 1 and 2 section further below.
////////////////////////////////////////////////////////////////////////////////
/// Form 1 - Combinational Logic and Level-Triggered Reg
// Describes combinational logic and level-triggered flip-flops (latches)
// :Syntax: always @( OBJ1 or OBJ2 or ... ) begin ST1; ST2; ... end
//
// OBJ1, OBJ2, etc are the names of nets are variables; these are
// said to be in the /sensitivity list/.
//
// ST1, ST2, etc are statements that conform to the following rules:
//
// Every net or variable appearing in an expression must be in the
// sensitivity list unless that value is written by an earlier
// statement. (If this rule is not followed simulation will not
// match synthesis.)
//
// ST1, ST2, etc. must not contain delays or event controls (#5,
// @( a ), wait).
//
// The number of iterations performed by looping constructs (covered
// soon) must be determinable by the synthesis program at analysis
// time (sort of like compile time). This will be explained further
// when looping constructs are covered.
//
// System tasks ($display, etc.) not allowed.
//
// Code between comments "// exemplar translate_off" and "//
// exemplar translate_on" will be ignored by the Leonardo Spectrum
// synthesis program and so need not follow the rules above. This
// code might be used for debugging and sanity checks (checks for
// design errors).
//
// Other restrictions to be covered later.
//
// Execution
//
// Activity flow starts (at ST1) each time there is a change
// on any of the items in the sensitivity list: OBJ1, OBJ2,
// :Example:
//
// An 8-bit adder in Form 1.
module sum_using_form_1(sum,a,b);
input [7:0] a, b;
output sum;
reg [8:0] sum;
// Code below executes each time a or b changes.
// always @( OBJ1 or OBJ2 or ... ) -> always @( a or b )
always @( a or b )
begin
sum = a + b; // ST1
end
endmodule
// :Example:
//
// Example of something which is almost Form 1. Unlike the adder
// above, the output of the module will not change when b changes,
// at least according to the simulator. (Some synthesis programs
// incorrectly synthesize this.)
module sum_using_not_quite_form_1(sum,a,b);
input [7:0] a, b;
output sum;
reg [8:0] sum;
// Code below executes each time a changes. This is close to
// Form 1, but not the same. (Simulated and synthesized versions
// will differ.)
always @( a )
begin
sum = a + b;
end
// Remember, code above is NOT Form 1 (nor any other synthesizable form).
endmodule
// :Example:
//
// A module for computing a complex product.
module complex_prod(xr,xi,ar,ai,br,bi);
input [31:0] ar, ai, br, bi;
output xr, xi;
reg [31:0] xr, xi;
// Temporary variables to hold products.
reg [31:0] p1, p2;
always @( ar or ai or br or bi )
begin
xr = ar * br - ai * bi;
p1 = ar * bi;
p2 = ai * br;
xi = p1 + p2;
end
endmodule
////////////////////////////////////////////////////////////////////////////////
/// Form 2 - Edge-Triggered Flip-Flops
// Describes edge-triggered flip flops.
// The description below is a simplified version of Form 2. The
// full version of Form 2 (not covered) includes asynchronous resets.
// :Syntax: always @( posedge CLK ) begin ST1; ST2; ... end
//
// CLK is a net or variable.
//
// ST1, ST2, etc are statements that conform to the following rules:
//
// ST1, ST2, etc. must not contain delays or event controls (#5,
// @( a ), wait).
//
// Each variable can be assigned in only one always block.
//
// The number of iterations performed by looping constructs (covered
// soon) must be determinable by the synthesis program at analysis
// time (sort of like compile time). This will be explained further
// when looping constructs are covered.
//
// No system tasks ($display, etc.).
//
// Other restrictions to be covered later.
// :Example:
//
// Module describing an adder with a buffered output. On the positive
// edge of clk output sum is set to a+b; that sum stays there until
// the next positive edge.
module sum_using_form_2(sum,a,b,clk);
input [7:0] a, b;
input clk;
output sum;
reg [7:0] sum;
// Code below executed each time clk changes to 1.
// always @( posedge CLK ) -> always @( posedge clk )
always @( posedge clk )
begin
sum = a + b; // ST1
end
endmodule
// :Example:
//
// A module for computing a complex product. The product
// is updated on the positive edge of the clock.
module complex_prod_2(xr,xi,ar,ai,br,bi,clk);
input [31:0] ar, ai, br, bi;
input clk;
output xr, xi;
reg [31:0] xr, xi;
// Holds products.
reg [31:0] p1, p2;
always @( posedge clk )
begin
xr = ar * br - ai * bi;
p1 = ar * bi;
p2 = ai * br;
xi = p1 + p2;
end
endmodule
////////////////////////////////////////////////////////////////////////////////
/// Synthesis of Forms 1 and 2 (Summary of Classes)
// Synthesis
//
// Synthesizable code will be decomposed into four classes,
// each with its own simple synthesis rules.
//
// The Classes:
//
// Assignment: (Covered here)
// Conditional: (Covered soon) if/else and case.
// Iterative: (Covered later) for, while, repeat, [forever]
// FormEnd: (Covered soon.) Indicates the end of a procedural block.
//
// Notation:
//
// SStatement -> Assignment | Conditional | Iterative
// (SStatement can refer to either Assignment, Conditional, or Iterative.)
// Structure of Form 1 always Block:
//
// :Syntax: always @( SLIST ) SStatement FormEnd
// :Syntax: always @( SLIST ) begin SStatement SStatement ... end FormEnd
//
// See first example below.
// Structure of Form 2 always Block:
//
// :Syntax: always @( posedge CLK ) SStatement FormEnd
// :Syntax: always @( posedge CLK )
// begin SStatement SStatement ... end FormEnd
// :Example:
//
// Module with comments indicating how the code is classified.
module syn_example_f1(x,y,a,b,c);
input [7:0] a, b, c;
output x, y;
reg [8:0] x, y;
// SLIST -> a or b or c
always @( a or b or c )
begin
x = a + b; // SStatement -> Assignment -> x = a + b;
y = x & c | b; // SStatement -> Assignment -> y = x & c | b;
x = b + 7; // SStatement -> Assignment -> x = b + 7;
end
// FormEnd There is no code here, it's just a place marker.
endmodule
/// Classes
//
// For Each Class:
//
// Hardware is synthesized.
// The hardware emits updated values of variables.
//
// So, for each class we need to:
//
// Determine what hardware is synthesized.
// Determine which variables get updated values.
//
// Warning:
//
// The descriptions of synthesized hardware below are occasionally
// simplified and may omit special cases, especially special cases
// that the writer (me) is not aware of!
/// Summary of Classes
//
// Assignment
//
// :Sample: x = a + b;
//
// Hardware:
// Combinational logic for right-hand side (RHS) of assignment.
// An adder for the sample above.
// Updated Variable:
// The assigned variable. Variable x in the sample above.
//
// Conditional (Based on material covered later.)
//
// :Sample: if( a ) begin x = y; c = 5; end else begin c = z; end
// Note: also includes case.
//
// Hardware:
// One multiplexor for each updated variable, each input
// from a different path (if, else).
// Updated Variables:
// All variables modified in "if" or "else" parts.
//
//
// Iterative (Based on material covered later.)
//
// :Sample: for(i=0;i<5;i=i+1) begin s = s + a[i]; end
// Note: also includes while, repeat, [forever].
//
// Hardware:
// Synthesize n copies of hardware corresponding to the loop body,
// where n is the number of iterations.
// Updated Variables:
// All variables updated in last (or any) iteration.
//
//
// FormEnd
//
// This one is important and is described in several places below.
//
// Each variable may synthesize in to a register, which means
// a variable may NOT synthesize in to a register. This has
// nothing to do with the declared type, since that should be
// reg (though one might get away with integer).
//
// Hardware:
// Form 1: Level-triggered registers (latches) for some modified variables.
// Form 2: Edge-triggered registers for some modified variables.
// Updated Variables:
// Those for which registers synthesized.
////////////////////////////////////////////////////////////////////////////////
/// Synthesis: Assignments Class, some FormEnd Class cases.
/// Assignment Class
//
// :Sample: sum = a + b;
//
// Hardware:
//
// Combinational logic corresponding to RHS, (the same hardware that
// would be synthesized for an assign).
//
// Updated Variable
//
// Variable on LHS.
/// FormEnd Class -- Form 1, No Conditional Code
//
// Hardware:
//
// None.
//
// Updated Variables.
//
// None, since there is no hardware.
/// FormEnd Class -- Form 2, No Conditional Code
//
// Hardware:
//
// For each variable assigned in the always block an edge-triggered
// flip-flop is synthesized. The latest value connects to the data
// (d) input and CLK connects to the clock input. The q output is
// the value used by all non-procedural code and the first statement
// of all procedural code.
//
// Updated Variables:
//
// One for each flip-flop output.
// :Example:
//
// Module showing how its code is classified by structure above.
module syn_example2_f1(z,x,y,a,b,c);
input [7:0] a, b, c;
output x, y, z;
reg [8:0] x, y;
wire [8:0] z;
assign z = x + 5;
always @( a or b or c )
begin
x = a + b; // HW: adder. Updated Variable: x
y = x & c | b; // HW: AND and OR. Updated Variable: y.
x = b + 7; // HW: adder. Updated Variable: x
end
// FormEnd: Nothing synthesized.
endmodule
// :Example:
//
// Module showing how its code is classified by structure above.
module syn_example2_f2(z,x,y,a,b,c,clk);
input [7:0] a, b, c;
input clk;
output x, y, z;
reg [8:0] x, y;
wire [8:0] z;
assign z = x + 5;
always @( posedge clk )
begin
x = a + b; // HW: adder. Updated Variable: x
y = x & c | b; // HW: AND and OR. Updated Variable: y.
x = b + 7; // HW: adder. Updated Variable: x
end
// FormEnd: Edge-triggered FF for y and x.
endmodule
////////////////////////////////////////////////////////////////////////////////
/// Syntax and Simulation of if else
// :P: 7.4
// :H: 2.6.1
// :LRM: 9.4
// Similar to their C counterparts.
// :Syntax: if( EXPR ) STATEMENT;
//
// If EXPR evaluates to a non-zero number, execute STATEMENT.
// Note that STATEMENT could be a begin/end block.
//
// :Syntax: if( EXPR ) STATEMENT1; else STATEMENT2
//
// If EXPR evaluates to a non-zero number, execute STATEMENT1
// otherwise execute STATEMENT2.
// :Example:
//
// Examples of if/else. This module is not synthesizable and
// does not do anything useful.
module if_examples();
integer a, b, c, d, x;
initial
begin
if( a < b ) c = 1;
if( a < b ) c = 2; else d = 3;
// Note: x = 5 is always executed; c = 3 only if a < b.
// This is an example of bad style, x = 5 should be put on
// the next line.
if( a < b ) c = 3; x = 5;
// Unlike the statement above, c=3 and x=5 are executed only if a < b.
if( a < b ) begin c = 3; x = 5; end
if( a < b )
begin
c = 3;
x = 5;
end
else
begin
c = 7;
x = 2;
end
if( a == 0 ) d = 7'b1110111;
else if( a == 1 ) d = 7'b0100100;
else if( a == 2 ) d = 7'b1011101;
else if( a == 3 ) d = 7'b1101101;
else if( a == 4 ) d = 7'b0101110;
else d = 7'b1111111;
end
endmodule
////////////////////////////////////////////////////////////////////////////////
/// Synthesis of Conditional Class (if/else)
/// Conditional - if / else
//
//:Syntax: if( COND ) IFPART
//:Syntax: if( COND ) IFPART else ELSEPART;
//
// Hardware:
//
// Synthesize hardware for IFPART and ELSEPART.
//
// Synthesize hardware to evaluate COND, call the output cond.
//
// Determine the union of variables modified in IFPART and ELSEPART.
// For each variable in the union:
//
// Synthesize a two-input multiplexor.
//
// Connect one input to the latest value in IFPART, or if the
// variable isn't updated in IFPART, the latest value before the
// "if".
//
// Connect the other input to the latest value in ELSEPART, or if
// the variable isn't updated in ELSEPART, the latest value
// before the "if".
//
// Connect cond to the control input.
//
// The multiplexor output is the updated value.
//
// A multiplexor might be eliminated in an optimization step,
// see FormEnd below.
//
// Updated Values
//
// All variables modified in "if" or "else" parts.
/// FormEnd Class Form 1, Conditional
//
// Updated Variables
//
// Those which may be unchanged due to an if or case condition.
// (Such as y in the example below.)
//
// Hardware
//
// For each possibly unchanged variable:
//
// A level-triggered flip-flop (latch).
//
// Logic that determines whether the variable will change, that
// logic connects to the flip-flop clock (or enable) input.
// (This may be the same or similar to the multiplexor input
// from Conditional class logic.)
//
// The latest value connects to the data (d) input.
//
// Optimization
//
// In many cases multiplexors can be eliminated. (See y in
// the example below.)
/// FormEnd Class Form 2, Conditional
//
// Updated Variables
//
// All assigned variables.
//
// Hardware
//
// For each variable:
//
// An edge-triggered flip-flop.
//
// CLK (see Form 2 syntax) connects to the clock input.
//
// Logic that determines whether the variable will change, that
// logic connects to the flip-flop enable input. (This may be
// the same or similar to the multiplexor input from Conditional
// class logic.)
//
// The latest value connects to the data (d) input.
// :Example:
//
// Very simple module to illustrate synthesis of if statement
// in Form 1 code.
module cond_form_1_example1(x,a,b,c);
input a, b,c;
output x;
reg x;
always @( a or b or c )
begin
if( a ) x = b | c; // SStatement1
end
// FormEnd
endmodule
// Here is how the module above should be /parsed/:
//
// SStatement1 -> Conditional -> if( COND ) IFPART
// COND -> a
// IFPART -> x = b | c;
//
// :Example:
//
// Simple module to illustrate synthesis of if/else statements in
// Form 1 code.
// Level-Triggered Registers: y, enabled by a.
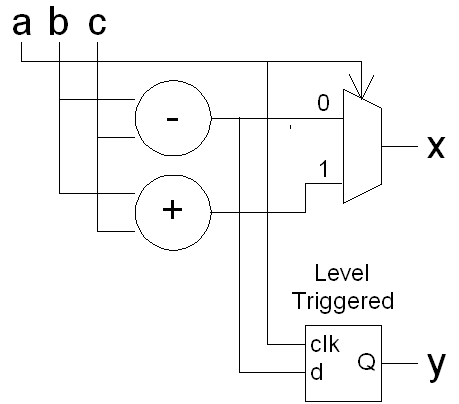
module cond_form_1_example2(x,y,a,b,c);
input a,b,c;
output x,y;
wire [7:0] b, c;
reg [8:0] x, y;
always @( a or b or c ) begin
if( a ) begin
x = b + c;
y = b - c;
end else begin
x = b - c;
end
end
endmodule
// Synthesized Hardware:
 // :Example:
//
// Simple module to illustrate synthesis of if/else statements in
// Form 2 code.
// Edge-Triggered Registers: x and y.
module cond_form_2_example2(x,y,a,b,c,clk);
input a,b,c;
input clk;
output x,y;
wire [7:0] b, c;
reg [8:0] x, y;
always @( posedge clk )
begin
if( a ) begin
x = b + c;
y = b - c;
end else begin
x = b - c;
end
end
endmodule
// :Example:
//
// Example of an if/else if/else chain.
// Registers: None. (x assigned on all paths.)
module anotherif(x,a);
input [7:0] a;
output x;
reg [7:0] x;
always @( a )
begin
if( a < 10 )
x = 1; // IFPART1
else
// ELSEPART1
if ( a < 50 )
x = 2; // IFPART2
else
// ELSEPART2
if ( a < 200 ) x = 3;
else x = 4;
end
endmodule
// :Example:
//
// Example of an if/else if/else chain.
// Level-Triggered Registers: x.
module yetanotherif(x,a);
input [7:0] a;
output x;
reg [7:0] x;
always @( a )
begin
if( a & 2 ) x = 6;
if( a < 10 ) x = 1;
else if ( a < 50 ) x = 2;
end
endmodule
// :Example:
//
// An example with lots of if's.
// Registers: None. (x is always assigned.)
module andyetanotherif(x,a);
input [7:0] a;
output x;
reg [7:0] x;
always @( a )
begin
x = a;
if( a[0] )
begin
x = x + 2;
if( a[1] & a[2] ) x = x + 1;
end
else
begin
if( a[3] ^ a[4] ) x = x + ( a >> 1 ); else x = x + ( a << 1 );
x = 3 * x;
end
if( x[7] ) x = x - 1;
end
endmodule
// :Example:
//
// Another ALU.
// Registers: None
module form1_alu(result,a,b,add);
input [31:0] a, b;
input add;
output result;
reg [31:0] result;
always @( a or b or add )
begin
if( add ) result = a + b; else result = a - b;
end
endmodule
// :Example:
//
// An ALU with an overflow output.
// Registers: None.
module form1_alu_with_overflow(result,overflow,carry,a,b,add);
input [31:0] a, b;
input add;
output result;
output carry, overflow;
reg carry, overflow;
reg [31:0] result;
always @( a or b or add )
begin
if( add ) result = a + b; else result = a - b;
overflow = a[31] != b[31] && a[31] != result[31];
end
endmodule
////////////////////////////////////////////////////////////////////////////////
/// Syntax and Simulation of case
// :P: 7.5, 7.5.1 case
// :H: 2.6.1
// :LRM: 9.5
// :Syntax: case ( EXPR )
// CEXP1:ST1;
// CEXP2:ST2;
// ...
// [default:STD;] // Optional
// endcase
//
// EXPR is an expression that evaluates to a number [or physical value].
// CEXP1, CEXP2, etc. are expressions that evaluate to a number [or physical
// value].
//
// Evaluate EXPR, find the first CEXP that is equal to EXPR,
// execute the corresponding ST. If none match and default is present
// execute STD.
// :Example:
//
// Description of a multiplexor using a case statement. Using a case
// statement is much less tedious than using the conditional operator.
module muxb(x,select,i0,i1,i2,i3);
input [1:0] select;
input [7:0] i0, i1, i2, i3;
output x;
reg [7:0] x;
always @( select or i0 or i1 or i2 or i3 )
begin
case ( select )
0: x = i0;
1: x = i1;
2: x = i2;
3: x = i3;
endcase
end
endmodule
// :Example:
//
// Module describing a selector. There are four data inputs,
// i0,i1,i2,i3, four control inputs c0, c1, c2, c3, c4, and a data
// output, x. The output is set to the first input with a
// corresponding control input of 1, or zero if all control inputs are
// zero. I'm sure you understand, but just in case see the truth table
// below.
//
// c3 c2 c1 c0 | x
// """""""""""""""
// 0 0 0 0 | 0
// 0 0 0 1 | i0
// 0 0 1 0 | i1
// 0 0 1 1 | i0
// 0 1 0 0 | i2
// 0 1 0 1 | i0
// 0 1 1 0 | i1
// 0 1 1 1 | i0
// 1 0 0 0 | i3
// 1 0 0 1 | i0
// 1 0 1 0 | i1
// 1 0 1 1 | i0
// 1 1 0 0 | i2
// 1 1 0 1 | i0
// 1 1 1 0 | i1
// 1 1 1 1 | i0
module selector(x,c0,c1,c2,c3,i0,i1,i2,i3);
input c0, c1, c2, c3;
input [7:0] i0, i1, i2, i3;
output x;
reg x;
always @( c0 or c1 or c2 or c3 or i0 or i1 or i2 or i3 )
begin
case( 1 )
c0: x = i0;
c1: x = i1;
c2: x = i2;
c3: x = i3;
default: x = 0;
endcase
end
endmodule
// :Example:
//
// Description of an ALU using case. This version is more
// readable than the structural descriptions.
module yet_another_alu(result,a,b,op);
input [31:0] a, b;
input [2:0] op;
output result;
reg [31:0] result;
parameter op_add = 0;
parameter op_sub = 1;
parameter op_and = 2;
parameter op_or = 3;
parameter op_slt = 4;
parameter op_a = 5;
parameter op_b = 6;
always @( a or b or op )
begin
case( op )
op_add : result = a + b;
op_sub : result = a - b;
op_and : result = a & b;
op_or : result = a | b;
op_slt : result = a < b;
op_a : result = a;
op_b : result = b;
default : result = 0;
endcase
end
endmodule
////////////////////////////////////////////////////////////////////////////////
/// Synthesis of Conditional Class (case, if/else chains)
/// Conditional - if/else chains and case.
//
// General Conditions: (See also Sequential Conditions)
//
// :Syntax: if( C1 ) ST1;
// else if ( C2 ) ST2;
// else if ( C3 ) ST3;
// ...
// else STD; // Optional
//
// :Syntax: case ( EXPR )
// CEXP1:ST1;
// CEXP2:ST2;
// CEXP3:ST3;
// ...
// default:STD; // Optional
// endcase
//
// Hardware:
//
// Synthesize hardware for ST1, ST2, ..., STD
//
// Synthesize hardware to evaluate either:
// C1, C2, ...; call respective outputs c1, c2,...
// EXPR == CEXP1, EXPR == CEXP2, ... call respective outputs c1, c2,...
//
// Determine the union of variables modified in ST1, ST2, ..., STD
// For each variable in the union:
//
// Synthesize a selector with one input per STx.
//
// For each STx:
// Connect the latest value of the variable in STx to a
// selector input, or if the variable isn't updated in STx,
// the latest value before the "case" or "if".
//
// Connect cx to the corresponding control input.
//
// The selector output is the updated value.
//
//
// Sequential Conditions:
//
// :Syntax: if( EXPR == 0 ) ST0;
// else if ( EXPR == 1 ) ST1;
// else if ( EXPR == 2 ) ST2;
// ...
//
// :Syntax: case ( EXPR )
// 0:ST0;
// 1:ST1;
// 2:ST2;
// ...
// endcase
//
// Hardware:
//
// Synthesize hardware for ST0, ST1, ...
//
// Synthesize hardware to evaluate EXPR, call the output expr.
//
// Determine the union of variables modified in ST0, ST1, ...
// For each variable in the union:
//
// Synthesize a multiplexor with one input per STx.
//
// Connect expr to the control input.
//
// For each STx:
// Connect the latest value of the variable in STx to a
// multiplexor input, or if the variable isn't updated in STx,
// the latest value before the "case" or "if".
//
// The multiplexor output is the updated value.
//
/// More Information
//
// The synthesis program may be smart enough to use a multiplexor
// instead of a selector for situations other than those implied under
// "Sequential Conditions" above.
// :Example:
//
// An up/down counter.
// This fall under "General Conditions" above.
// Edge-triggered registers: count.
module up_down_counter(count,up,reset,clk);
input up, reset, clk;
output count;
reg [7:0] count;
always @( posedge clk )
begin
if( reset ) count = 0;
else if( up ) count = count + 1;
else count = count - 1;
end
endmodule
// :Example:
//
// A mux, the hard way, but look at how the if/else chain works.
// Because the if conditions check for consecutive constants (0,1,2)
// instead of using three two-input muxen, Leonardo (the synthesis
// program) uses one four-input multiplexor.
// This falls under "Sequential Conditions" above.
// Registers: None.
module mux(x,select,i0,i1,i2,i3);
input [1:0] select;
input [7:0] i0, i1, i2, i3;
output x;
reg [7:0] x;
always @( select or i0 or i1 or i2 or i3 )
begin
if( select == 0 ) x = i0;
else if( select == 1 ) x = i1;
else if( select == 2 ) x = i2;
else x = i3;
end
endmodule
// :Example:
//
// It looks like a selector but it's not. The synthesized hardware
// will make use of a selector, but the entire module is not a
// selector. How is it not a selector?
module not_exactly_a_selector(x,c0,c1,c2,c3,i0,i1,i2,i3);
input c0, c1, c2, c3;
input [7:0] i0, i1, i2, i3;
output x;
reg x;
always @( c0 or c1 or c2 or c3 or i0 or i1 or i2 or i3 )
begin
case( 1 )
c0: x = i0;
c1: x = i1;
c2: x = i2;
c3: x = i3;
endcase
end
endmodule
// Variable x is not always assigned, so the selector output
// goes to a level-triggered flip-flop. When none of the
// control inputs are set the module output is set to the
// last input with an asserted control.
//
// Level-Triggered Register: x
////////////////////////////////////////////////////////////////////////////////
/// Syntax and Simulation of for, while, repeat
// :P: 7.6, 7.6.1, 7.6.2, 7.6.3
// :H: 2.6.2
// :LRM: 9.6
// In descriptions below remember STATEMENT can be a single statement or:
// STATEMENT -> begin STATEMENT1; STATEMENT2; ... end
// :Syntax: for( INIT_ASSIGN; CONDITION; STEP_ASSIGN ) STATEMENT
//
// Some C programmers might find the for loop disappointing:
// INIT_ASSIGN must be an assignment, not an arbitrary statement.
// STEP_ASSIGN must be an assignment, not an arbitrary statement.
// CONDITION is an expression that evaluates to an integer.
//
// 1. Execute INIT_ASSIGN.
// 2. Evaluate CONDITION, if true go to next step, else done.
// 3. Execute STATEMENT
// 4. Execute STEP_ASSIGN;
// 5. Go to step 2.
// :Syntax: while( CONDITION ) STATEMENT
//
// 1. Evaluate CONDITION, if false done, else go to next step.
// 2. Execute STATEMENT.
// 3. Go to step 1.
// :Syntax: repeat( COUNT ) STATEMENT
//
// COUNT is an expression that evaluates to an integer.
//
// 1. Evaluate COUNT, call result the_count.
// 2. Execute STATEMENT the_count times.
// There is a mechanism for breaking out of these loops, but it's not
// as convenient as C's break and it won't be covered in this
// course. (If you gotta know, look for disable in
// http://www.ece.lsu.edu/v/2001/l040.html.)
// :Example:
//
// Easy looping (for, while, repeat) examples.
module for_example();
integer i, sum;
initial
begin
sum = 0;
for(i=0; i<10; i=i+1)
begin
$display("So far i=%d and sum=%d",i,sum);
sum = sum + i;
end
$display("Finally i=%d and sum=%d",i,sum);
sum = 0; i = 0;
while( i < 10 )
begin
$display("So far i=%d and sum=%d",i,sum);
sum = sum + i;
i = i + 1;
end
$display("Finally i=%d and sum=%d",i,sum);
sum = 0; i = 0;
repeat( 10 )
begin
$display("So far i=%d and sum=%d",i,sum);
sum = sum + i;
i = i + 1;
end
$display("Finally i=%d and sum=%d",i,sum);
end
endmodule
// :Example:
//
// Looping (for,while,repeat) with additional information.
module looping_examples();
integer a, b, c;
integer i, pop, x;
reg clock, clock2;
initial begin
/// for
// Basic for loop.
for(i=0; i<3; i=i+1) $display("yada");
// There is no postincrement operator. :-(
// for(i=0; i<3; i++) $display("yada"); // Syntax error.
// Can only have a single initialization assignment. :-(
//for(i=0, j=0; i<3; i=i+1) $display("yada"); // Syntax error.
/// while
// Basic while loop.
while( x < 10 ) x = x + 1;
// Sorry, assignment (=) is not an operator as in C.
// while( i = i - 1 ) x = x + 1; // Syntax error.
/// Three Ways to Iterate Ten Times:
// The simplest way is the best. (repeat).
repeat( 10 ) x = x + 1;
for(i=0; i<10; i=i+1) x = x + 1;
i = 10; while( i ) begin i = i - 1; x = x + 1; end
// while example, count the 1's in b.
pop = 0;
while( b )
begin
pop = pop + b[0];
b = b >> 1;
end
end
endmodule
// :Example:
//
// A module that computes the population of its integer input. The
// population of an integer is simply the number of 1's in its
// binary representation. (The population of: 1 is 1, 2 is 1, 3 is 2,
// 5 is 2, and 15 is 4.)
module pop_combinational(p,a);
input [31:0] a;
output p;
reg [6:0] p;
integer i;
always @( a )
begin
p = 0;
for(i=0; i<32; i=i+1) p = p + a[i];
end
endmodule
////////////////////////////////////////////////////////////////////////////////
/// Synthesis of Iteration Class (for, while, repeat)
/// Iteration - for, while, repeat
//
// :Syntax: for( INIT_ASSIGN; CONDITION; STEP_ASSIGN ) BODY
// :Syntax: while( CONDITION ) BODY
// :Syntax: repeat( COUNT ) BODY
//
// Remember
//
// The number of iterations must be determinable by the synthesis
// program (and it may not be as smart as you'd like) at analysis
// (sort of synthesis or compile) time.
//
// Hardware:
//
// Let n denote number of iterations.
//
// Synthesize and cascade (connect in series) n copies of BODY.
//
// For a "for" loop, determine value of iteration variable (e.g., i)
// at each iteration, and use that as an input into the hardware
// for the corresponding iteration.
//
// Updated Variables:
//
// Variables updated in the last iteration.
// :Example:
//
// Simple repeat example.
module times_five(five_a,a);
input [7:0] a;
output [10:0] five_a;
reg [10:0] five_a;
always @( a ) begin
five_a = 0;
repeat( 5 ) five_a = five_a + a;
end
endmodule
// :Example:
//
// Simple for example.
module sumthing(sum,a);
input [7:0] a;
output [15:0] sum;
integer i;
always @( a ) begin
sum = a;
for(i = 0; i < 5; i = i + 1 ) sum = a + sum * i;
end
endmodule
// :Example:
//
// Simple for example.
module times_five_f(five_a,a);
input [7:0] a;
output [10:0] five_a;
reg [10:0] five_a;
integer i;
always @( a ) begin
five_a = 0;
for(i = 0; i < 5; i = i + 1 ) five_a = five_a + a;
end
endmodule
//
// Note: synthesized hardware identical to version with repeat loop.
// :Example:
//
// Another population count module, but with five bits.
module pop_combinational_s(p,a);
input [4:0] a;
output p;
reg [2:0] p;
// In good coding style items to be synthesized are wires or regs
// and integers are used for testbench code.
// Nevertheless, there is a good reason why i is an integer.
integer i;
// Form 1
always @( a )
begin
// ST1 -> Assignment -> p = 0;
p = 0;
// ST2 -> Iteration -> for( INIT_ASSIGN; CONDITION; STEP_ASSIGN ) BODY
// INIT_ASSIGN -> i=0
// CONDITION -> i<5
// STEP_ASSIGN -> i=i+1
// BODY -> p=p+a[i];
for(i=0; i<5; i=i+1) p = p + a[i];
end
// FormEnd
// A register is not needed for p because it's always assigned.
// A register is not needed for i because it is not live out (it's
// not referenced elsewhere). (Even if it were, it's value would
// be the constant 5 so a register would not be needed anyway.)
endmodule
// Note:
//
// Make five copies of body, p = p + a[i]; (an adder).
// In first copy set i -> 0, in second set i -> 1, etc.
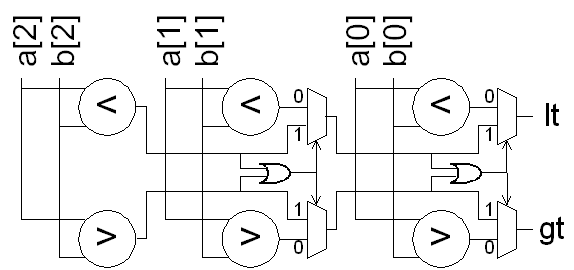
// :Example:
//
// A comparison module. Output gt is asserted if a < b
// and lt is asserted if a > b. (Appeared on a 2000 final exam.)
module compare(gt, lt, a, b);
input a, b;
output gt, lt;
wire [2:0] a, b;
reg gt, lt;
integer i;
always @( a or b ) begin
gt = 0; lt = 0;
for(i=2; i>=0; i=i-1)
if( !gt && !lt ) begin
if( a[i] < b[i] ) lt = 1;
if( a[i] > b[i] ) gt = 1;
end
end
endmodule // compare
// Synthesized Hardware:
// :Example:
//
// Simple module to illustrate synthesis of if/else statements in
// Form 2 code.
// Edge-Triggered Registers: x and y.
module cond_form_2_example2(x,y,a,b,c,clk);
input a,b,c;
input clk;
output x,y;
wire [7:0] b, c;
reg [8:0] x, y;
always @( posedge clk )
begin
if( a ) begin
x = b + c;
y = b - c;
end else begin
x = b - c;
end
end
endmodule
// :Example:
//
// Example of an if/else if/else chain.
// Registers: None. (x assigned on all paths.)
module anotherif(x,a);
input [7:0] a;
output x;
reg [7:0] x;
always @( a )
begin
if( a < 10 )
x = 1; // IFPART1
else
// ELSEPART1
if ( a < 50 )
x = 2; // IFPART2
else
// ELSEPART2
if ( a < 200 ) x = 3;
else x = 4;
end
endmodule
// :Example:
//
// Example of an if/else if/else chain.
// Level-Triggered Registers: x.
module yetanotherif(x,a);
input [7:0] a;
output x;
reg [7:0] x;
always @( a )
begin
if( a & 2 ) x = 6;
if( a < 10 ) x = 1;
else if ( a < 50 ) x = 2;
end
endmodule
// :Example:
//
// An example with lots of if's.
// Registers: None. (x is always assigned.)
module andyetanotherif(x,a);
input [7:0] a;
output x;
reg [7:0] x;
always @( a )
begin
x = a;
if( a[0] )
begin
x = x + 2;
if( a[1] & a[2] ) x = x + 1;
end
else
begin
if( a[3] ^ a[4] ) x = x + ( a >> 1 ); else x = x + ( a << 1 );
x = 3 * x;
end
if( x[7] ) x = x - 1;
end
endmodule
// :Example:
//
// Another ALU.
// Registers: None
module form1_alu(result,a,b,add);
input [31:0] a, b;
input add;
output result;
reg [31:0] result;
always @( a or b or add )
begin
if( add ) result = a + b; else result = a - b;
end
endmodule
// :Example:
//
// An ALU with an overflow output.
// Registers: None.
module form1_alu_with_overflow(result,overflow,carry,a,b,add);
input [31:0] a, b;
input add;
output result;
output carry, overflow;
reg carry, overflow;
reg [31:0] result;
always @( a or b or add )
begin
if( add ) result = a + b; else result = a - b;
overflow = a[31] != b[31] && a[31] != result[31];
end
endmodule
////////////////////////////////////////////////////////////////////////////////
/// Syntax and Simulation of case
// :P: 7.5, 7.5.1 case
// :H: 2.6.1
// :LRM: 9.5
// :Syntax: case ( EXPR )
// CEXP1:ST1;
// CEXP2:ST2;
// ...
// [default:STD;] // Optional
// endcase
//
// EXPR is an expression that evaluates to a number [or physical value].
// CEXP1, CEXP2, etc. are expressions that evaluate to a number [or physical
// value].
//
// Evaluate EXPR, find the first CEXP that is equal to EXPR,
// execute the corresponding ST. If none match and default is present
// execute STD.
// :Example:
//
// Description of a multiplexor using a case statement. Using a case
// statement is much less tedious than using the conditional operator.
module muxb(x,select,i0,i1,i2,i3);
input [1:0] select;
input [7:0] i0, i1, i2, i3;
output x;
reg [7:0] x;
always @( select or i0 or i1 or i2 or i3 )
begin
case ( select )
0: x = i0;
1: x = i1;
2: x = i2;
3: x = i3;
endcase
end
endmodule
// :Example:
//
// Module describing a selector. There are four data inputs,
// i0,i1,i2,i3, four control inputs c0, c1, c2, c3, c4, and a data
// output, x. The output is set to the first input with a
// corresponding control input of 1, or zero if all control inputs are
// zero. I'm sure you understand, but just in case see the truth table
// below.
//
// c3 c2 c1 c0 | x
// """""""""""""""
// 0 0 0 0 | 0
// 0 0 0 1 | i0
// 0 0 1 0 | i1
// 0 0 1 1 | i0
// 0 1 0 0 | i2
// 0 1 0 1 | i0
// 0 1 1 0 | i1
// 0 1 1 1 | i0
// 1 0 0 0 | i3
// 1 0 0 1 | i0
// 1 0 1 0 | i1
// 1 0 1 1 | i0
// 1 1 0 0 | i2
// 1 1 0 1 | i0
// 1 1 1 0 | i1
// 1 1 1 1 | i0
module selector(x,c0,c1,c2,c3,i0,i1,i2,i3);
input c0, c1, c2, c3;
input [7:0] i0, i1, i2, i3;
output x;
reg x;
always @( c0 or c1 or c2 or c3 or i0 or i1 or i2 or i3 )
begin
case( 1 )
c0: x = i0;
c1: x = i1;
c2: x = i2;
c3: x = i3;
default: x = 0;
endcase
end
endmodule
// :Example:
//
// Description of an ALU using case. This version is more
// readable than the structural descriptions.
module yet_another_alu(result,a,b,op);
input [31:0] a, b;
input [2:0] op;
output result;
reg [31:0] result;
parameter op_add = 0;
parameter op_sub = 1;
parameter op_and = 2;
parameter op_or = 3;
parameter op_slt = 4;
parameter op_a = 5;
parameter op_b = 6;
always @( a or b or op )
begin
case( op )
op_add : result = a + b;
op_sub : result = a - b;
op_and : result = a & b;
op_or : result = a | b;
op_slt : result = a < b;
op_a : result = a;
op_b : result = b;
default : result = 0;
endcase
end
endmodule
////////////////////////////////////////////////////////////////////////////////
/// Synthesis of Conditional Class (case, if/else chains)
/// Conditional - if/else chains and case.
//
// General Conditions: (See also Sequential Conditions)
//
// :Syntax: if( C1 ) ST1;
// else if ( C2 ) ST2;
// else if ( C3 ) ST3;
// ...
// else STD; // Optional
//
// :Syntax: case ( EXPR )
// CEXP1:ST1;
// CEXP2:ST2;
// CEXP3:ST3;
// ...
// default:STD; // Optional
// endcase
//
// Hardware:
//
// Synthesize hardware for ST1, ST2, ..., STD
//
// Synthesize hardware to evaluate either:
// C1, C2, ...; call respective outputs c1, c2,...
// EXPR == CEXP1, EXPR == CEXP2, ... call respective outputs c1, c2,...
//
// Determine the union of variables modified in ST1, ST2, ..., STD
// For each variable in the union:
//
// Synthesize a selector with one input per STx.
//
// For each STx:
// Connect the latest value of the variable in STx to a
// selector input, or if the variable isn't updated in STx,
// the latest value before the "case" or "if".
//
// Connect cx to the corresponding control input.
//
// The selector output is the updated value.
//
//
// Sequential Conditions:
//
// :Syntax: if( EXPR == 0 ) ST0;
// else if ( EXPR == 1 ) ST1;
// else if ( EXPR == 2 ) ST2;
// ...
//
// :Syntax: case ( EXPR )
// 0:ST0;
// 1:ST1;
// 2:ST2;
// ...
// endcase
//
// Hardware:
//
// Synthesize hardware for ST0, ST1, ...
//
// Synthesize hardware to evaluate EXPR, call the output expr.
//
// Determine the union of variables modified in ST0, ST1, ...
// For each variable in the union:
//
// Synthesize a multiplexor with one input per STx.
//
// Connect expr to the control input.
//
// For each STx:
// Connect the latest value of the variable in STx to a
// multiplexor input, or if the variable isn't updated in STx,
// the latest value before the "case" or "if".
//
// The multiplexor output is the updated value.
//
/// More Information
//
// The synthesis program may be smart enough to use a multiplexor
// instead of a selector for situations other than those implied under
// "Sequential Conditions" above.
// :Example:
//
// An up/down counter.
// This fall under "General Conditions" above.
// Edge-triggered registers: count.
module up_down_counter(count,up,reset,clk);
input up, reset, clk;
output count;
reg [7:0] count;
always @( posedge clk )
begin
if( reset ) count = 0;
else if( up ) count = count + 1;
else count = count - 1;
end
endmodule
// :Example:
//
// A mux, the hard way, but look at how the if/else chain works.
// Because the if conditions check for consecutive constants (0,1,2)
// instead of using three two-input muxen, Leonardo (the synthesis
// program) uses one four-input multiplexor.
// This falls under "Sequential Conditions" above.
// Registers: None.
module mux(x,select,i0,i1,i2,i3);
input [1:0] select;
input [7:0] i0, i1, i2, i3;
output x;
reg [7:0] x;
always @( select or i0 or i1 or i2 or i3 )
begin
if( select == 0 ) x = i0;
else if( select == 1 ) x = i1;
else if( select == 2 ) x = i2;
else x = i3;
end
endmodule
// :Example:
//
// It looks like a selector but it's not. The synthesized hardware
// will make use of a selector, but the entire module is not a
// selector. How is it not a selector?
module not_exactly_a_selector(x,c0,c1,c2,c3,i0,i1,i2,i3);
input c0, c1, c2, c3;
input [7:0] i0, i1, i2, i3;
output x;
reg x;
always @( c0 or c1 or c2 or c3 or i0 or i1 or i2 or i3 )
begin
case( 1 )
c0: x = i0;
c1: x = i1;
c2: x = i2;
c3: x = i3;
endcase
end
endmodule
// Variable x is not always assigned, so the selector output
// goes to a level-triggered flip-flop. When none of the
// control inputs are set the module output is set to the
// last input with an asserted control.
//
// Level-Triggered Register: x
////////////////////////////////////////////////////////////////////////////////
/// Syntax and Simulation of for, while, repeat
// :P: 7.6, 7.6.1, 7.6.2, 7.6.3
// :H: 2.6.2
// :LRM: 9.6
// In descriptions below remember STATEMENT can be a single statement or:
// STATEMENT -> begin STATEMENT1; STATEMENT2; ... end
// :Syntax: for( INIT_ASSIGN; CONDITION; STEP_ASSIGN ) STATEMENT
//
// Some C programmers might find the for loop disappointing:
// INIT_ASSIGN must be an assignment, not an arbitrary statement.
// STEP_ASSIGN must be an assignment, not an arbitrary statement.
// CONDITION is an expression that evaluates to an integer.
//
// 1. Execute INIT_ASSIGN.
// 2. Evaluate CONDITION, if true go to next step, else done.
// 3. Execute STATEMENT
// 4. Execute STEP_ASSIGN;
// 5. Go to step 2.
// :Syntax: while( CONDITION ) STATEMENT
//
// 1. Evaluate CONDITION, if false done, else go to next step.
// 2. Execute STATEMENT.
// 3. Go to step 1.
// :Syntax: repeat( COUNT ) STATEMENT
//
// COUNT is an expression that evaluates to an integer.
//
// 1. Evaluate COUNT, call result the_count.
// 2. Execute STATEMENT the_count times.
// There is a mechanism for breaking out of these loops, but it's not
// as convenient as C's break and it won't be covered in this
// course. (If you gotta know, look for disable in
// http://www.ece.lsu.edu/v/2001/l040.html.)
// :Example:
//
// Easy looping (for, while, repeat) examples.
module for_example();
integer i, sum;
initial
begin
sum = 0;
for(i=0; i<10; i=i+1)
begin
$display("So far i=%d and sum=%d",i,sum);
sum = sum + i;
end
$display("Finally i=%d and sum=%d",i,sum);
sum = 0; i = 0;
while( i < 10 )
begin
$display("So far i=%d and sum=%d",i,sum);
sum = sum + i;
i = i + 1;
end
$display("Finally i=%d and sum=%d",i,sum);
sum = 0; i = 0;
repeat( 10 )
begin
$display("So far i=%d and sum=%d",i,sum);
sum = sum + i;
i = i + 1;
end
$display("Finally i=%d and sum=%d",i,sum);
end
endmodule
// :Example:
//
// Looping (for,while,repeat) with additional information.
module looping_examples();
integer a, b, c;
integer i, pop, x;
reg clock, clock2;
initial begin
/// for
// Basic for loop.
for(i=0; i<3; i=i+1) $display("yada");
// There is no postincrement operator. :-(
// for(i=0; i<3; i++) $display("yada"); // Syntax error.
// Can only have a single initialization assignment. :-(
//for(i=0, j=0; i<3; i=i+1) $display("yada"); // Syntax error.
/// while
// Basic while loop.
while( x < 10 ) x = x + 1;
// Sorry, assignment (=) is not an operator as in C.
// while( i = i - 1 ) x = x + 1; // Syntax error.
/// Three Ways to Iterate Ten Times:
// The simplest way is the best. (repeat).
repeat( 10 ) x = x + 1;
for(i=0; i<10; i=i+1) x = x + 1;
i = 10; while( i ) begin i = i - 1; x = x + 1; end
// while example, count the 1's in b.
pop = 0;
while( b )
begin
pop = pop + b[0];
b = b >> 1;
end
end
endmodule
// :Example:
//
// A module that computes the population of its integer input. The
// population of an integer is simply the number of 1's in its
// binary representation. (The population of: 1 is 1, 2 is 1, 3 is 2,
// 5 is 2, and 15 is 4.)
module pop_combinational(p,a);
input [31:0] a;
output p;
reg [6:0] p;
integer i;
always @( a )
begin
p = 0;
for(i=0; i<32; i=i+1) p = p + a[i];
end
endmodule
////////////////////////////////////////////////////////////////////////////////
/// Synthesis of Iteration Class (for, while, repeat)
/// Iteration - for, while, repeat
//
// :Syntax: for( INIT_ASSIGN; CONDITION; STEP_ASSIGN ) BODY
// :Syntax: while( CONDITION ) BODY
// :Syntax: repeat( COUNT ) BODY
//
// Remember
//
// The number of iterations must be determinable by the synthesis
// program (and it may not be as smart as you'd like) at analysis
// (sort of synthesis or compile) time.
//
// Hardware:
//
// Let n denote number of iterations.
//
// Synthesize and cascade (connect in series) n copies of BODY.
//
// For a "for" loop, determine value of iteration variable (e.g., i)
// at each iteration, and use that as an input into the hardware
// for the corresponding iteration.
//
// Updated Variables:
//
// Variables updated in the last iteration.
// :Example:
//
// Simple repeat example.
module times_five(five_a,a);
input [7:0] a;
output [10:0] five_a;
reg [10:0] five_a;
always @( a ) begin
five_a = 0;
repeat( 5 ) five_a = five_a + a;
end
endmodule
// :Example:
//
// Simple for example.
module sumthing(sum,a);
input [7:0] a;
output [15:0] sum;
integer i;
always @( a ) begin
sum = a;
for(i = 0; i < 5; i = i + 1 ) sum = a + sum * i;
end
endmodule
// :Example:
//
// Simple for example.
module times_five_f(five_a,a);
input [7:0] a;
output [10:0] five_a;
reg [10:0] five_a;
integer i;
always @( a ) begin
five_a = 0;
for(i = 0; i < 5; i = i + 1 ) five_a = five_a + a;
end
endmodule
//
// Note: synthesized hardware identical to version with repeat loop.
// :Example:
//
// Another population count module, but with five bits.
module pop_combinational_s(p,a);
input [4:0] a;
output p;
reg [2:0] p;
// In good coding style items to be synthesized are wires or regs
// and integers are used for testbench code.
// Nevertheless, there is a good reason why i is an integer.
integer i;
// Form 1
always @( a )
begin
// ST1 -> Assignment -> p = 0;
p = 0;
// ST2 -> Iteration -> for( INIT_ASSIGN; CONDITION; STEP_ASSIGN ) BODY
// INIT_ASSIGN -> i=0
// CONDITION -> i<5
// STEP_ASSIGN -> i=i+1
// BODY -> p=p+a[i];
for(i=0; i<5; i=i+1) p = p + a[i];
end
// FormEnd
// A register is not needed for p because it's always assigned.
// A register is not needed for i because it is not live out (it's
// not referenced elsewhere). (Even if it were, it's value would
// be the constant 5 so a register would not be needed anyway.)
endmodule
// Note:
//
// Make five copies of body, p = p + a[i]; (an adder).
// In first copy set i -> 0, in second set i -> 1, etc.
// :Example:
//
// A comparison module. Output gt is asserted if a < b
// and lt is asserted if a > b. (Appeared on a 2000 final exam.)
module compare(gt, lt, a, b);
input a, b;
output gt, lt;
wire [2:0] a, b;
reg gt, lt;
integer i;
always @( a or b ) begin
gt = 0; lt = 0;
for(i=2; i>=0; i=i-1)
if( !gt && !lt ) begin
if( a[i] < b[i] ) lt = 1;
if( a[i] > b[i] ) gt = 1;
end
end
endmodule // compare
// Synthesized Hardware:
 // :Example:
//
// Non-synthesizable loop. The loop cannot be synthesized because the
// number of iterations in not a constant (it depends on the module
// input, a). For this particular case one could set the sum to
// a(a+1)/2.
module not_synthesizable_sum(sum,a);
input [7:0] a;
output [10:0] sum;
reg [10:0] sum;
integer i;
always @( a ) begin
sum = 0;
for(i=0; i<a; i=i+1) sum = sum + i;
end
endmodule
//
// Leonardo message: Error, expression does not evaluate to a constant.
// :Example:
//
// The code below is synthesizable but requires 256 copies of the loop
// body and so is probably impractical. Computing a(a+1)/2 is much
// easier.
module synthesizable_sum_but(sum,a);
input [7:0] a;
output [10:0] sum;
reg [10:0] sum;
integer i;
always @( a ) begin
sum = 0;
for(i=0; i<256; i=i+1) if( i < a ) sum = sum + i;
end
endmodule
////////////////////////////////////////////////////////////////////////////////
/// Ripple Adder: Combinational v. Sequential
///
// Q: I need to iterate lots of times, but I just can't afford the hardware.
// What do I do?
//
// A: Use sequential logic.
// Three approaches to ripple adder will be shown:
//
// (1) Ripple Classic:
// Combinational Logic using structural code.
//
// (2) Ripple Procedural Combinational:
// Hardware identical to ripple classic.
//
// (3) Ripple Sequential:
// Uses sequential logic.
//
// In terms of synthesized hardware, (1) and (2) are very similar
// (possibly identical). Choose the one which is more readable.
//
// (3) uses only one BFA, but its slower since it requires one clock
// cycle per bit.
//
// If a BFA used lots of gates, (3) would be the low-cost solution.
//
// :Example:
//
// Classic ripple counter.
module ripple_classic(sum,cout,a,b);
input [3:0] a, b;
output [3:0] sum;
output cout;
wire c0, c1, c2;
bfa_implicit bfa0(sum[0],c0,a[0],b[0],1'b0);
bfa_implicit bfa1(sum[1],c1,a[1],b[1],c0);
bfa_implicit bfa2(sum[2],c2,a[2],b[2],c1);
bfa_implicit bfa3(sum[3],cout,a[3],b[3],c2);
endmodule
// :Example:
//
// A ripple adder made from binary full adders, but using
// procedural code. Except for the number of bits, equivalent
// to the one above.
module ripple_redux(sum,a,b);
input [31:0] a, b;
output sum;
reg [32:0] sum;
reg carry;
integer i;
always @( a or b )
begin
carry = 0;
for(i=0; i<32; i=i+1) begin
sum[i] = a[i] ^ b[i] ^ carry;
carry = a[i] & b[i] | a[i] & carry | b[i] & carry;
end
sum[32] = carry;
end
endmodule
// :Example:
//
// A sequential ripple counter. It uses less hardware but is slower.
// (There is not much point in dividing an adder in to several cycles,
// but such an approach is used for multipliers.)
module ripple_redux_comb(sum,a,b,clk);
input [31:0] a, b;
input clk;
output sum;
reg [32:0] sum;
reg carry;
reg [4:0] i;
initial i = 0;
always @( posedge clk )
begin
if( i == 0 ) begin
sum[32] = carry;
carry = 0;
end
sum[i] = a[i] ^ b[i] ^ carry;
carry = a[i] & b[i] | a[i] & carry | b[i] & carry;
i = i + 1;
end
endmodule
////////////////////////////////////////////////////////////////////////////////
/// Miscellaneous Examples
// :Example:
//
// Clocked population count module. The correct output
// appears at most 32 clock cycles after the input. Other
// than counting cycles or knowing what the correct output should be,
// there is no way to tell that the
// output is ready.
module pop(p,a,clk);
input [31:0] a;
input clk;
output p;
reg [6:0] p;
reg [31:0] acopy;
reg [6:0] pcopy;
always @( posedge clk )
begin
if( acopy == 0 )
begin
p = pcopy;
pcopy = 0;
acopy = a;
end
else
begin
pcopy = pcopy + acopy[0];
acopy = acopy >> 1;
end
end
endmodule
// :Example:
//
// Population count with handshaking. Handshaking is the use of
// control signals between two modules to coordinate activities.
//
// In this case:
// The external module waits (if necessary) for ready to be 1.
// The external module then puts a number on "a" and asserts start.
// pop_with_handshaking_1 copies the number and sets ready to zero.
// When start goes to zero, pop_with_handshaking_1 starts computing.
// When pop_with_handshaking_1 is finished it asserts ready.
module pop_with_handshaking_1(p,ready,a,start,clk);
input [31:0] a;
input start, clk;
output p, ready;
reg [6:0] p;
reg ready;
reg [31:0] acopy;
always @( posedge clk )
begin
if( start )
begin
acopy = a;
p = 0;
ready = 0;
end
else if( !ready && acopy )
begin
p = p + acopy[0];
acopy = acopy >> 1;
end
else if( !ready && !acopy )
begin
ready = 1;
end
end
endmodule
/// Material below this point is under construction.
module text_to_binary(bin,valid,text,clk);
input [7:0] text;
input clk;
output bin, valid;
reg [31:0] bin;
reg valid;
always @( posedge clk )
begin
end
endmodule
// :Keyword: $stop (System task)
//
// Stops simulation. Used for testbenches and debugging.
module demo_counter();
wire [7:0] count;
reg up, reset, clk;
up_down_counter c1(count,up,reset,clk);
integer i;
initial
begin
i = 0;
up = 1;
reset = 1;
for(i=0; i<4; i=i+1) @( posedge clk );
reset = 0;
for(i=0; i<20; i=i-1)
begin
if( i != count )
begin
$display("Something wrong at i=%d, count=%d",i,count);
$stop;
end
@( posedge clk ); #1;
end
up = 0;
for(i=i; i>=0; i=i-1)
begin
if( i != count )
begin
$display("Something wrong at i=%d, count=%d",i,count);
$stop;
end
@( posedge clk ); #1;
end
$display("Done with tests.");
end
always begin clk = 0; #5; clk = 1; #5; end
endmodule
// :Example:
//
// Non-synthesizable loop. The loop cannot be synthesized because the
// number of iterations in not a constant (it depends on the module
// input, a). For this particular case one could set the sum to
// a(a+1)/2.
module not_synthesizable_sum(sum,a);
input [7:0] a;
output [10:0] sum;
reg [10:0] sum;
integer i;
always @( a ) begin
sum = 0;
for(i=0; i<a; i=i+1) sum = sum + i;
end
endmodule
//
// Leonardo message: Error, expression does not evaluate to a constant.
// :Example:
//
// The code below is synthesizable but requires 256 copies of the loop
// body and so is probably impractical. Computing a(a+1)/2 is much
// easier.
module synthesizable_sum_but(sum,a);
input [7:0] a;
output [10:0] sum;
reg [10:0] sum;
integer i;
always @( a ) begin
sum = 0;
for(i=0; i<256; i=i+1) if( i < a ) sum = sum + i;
end
endmodule
////////////////////////////////////////////////////////////////////////////////
/// Ripple Adder: Combinational v. Sequential
///
// Q: I need to iterate lots of times, but I just can't afford the hardware.
// What do I do?
//
// A: Use sequential logic.
// Three approaches to ripple adder will be shown:
//
// (1) Ripple Classic:
// Combinational Logic using structural code.
//
// (2) Ripple Procedural Combinational:
// Hardware identical to ripple classic.
//
// (3) Ripple Sequential:
// Uses sequential logic.
//
// In terms of synthesized hardware, (1) and (2) are very similar
// (possibly identical). Choose the one which is more readable.
//
// (3) uses only one BFA, but its slower since it requires one clock
// cycle per bit.
//
// If a BFA used lots of gates, (3) would be the low-cost solution.
//
// :Example:
//
// Classic ripple counter.
module ripple_classic(sum,cout,a,b);
input [3:0] a, b;
output [3:0] sum;
output cout;
wire c0, c1, c2;
bfa_implicit bfa0(sum[0],c0,a[0],b[0],1'b0);
bfa_implicit bfa1(sum[1],c1,a[1],b[1],c0);
bfa_implicit bfa2(sum[2],c2,a[2],b[2],c1);
bfa_implicit bfa3(sum[3],cout,a[3],b[3],c2);
endmodule
// :Example:
//
// A ripple adder made from binary full adders, but using
// procedural code. Except for the number of bits, equivalent
// to the one above.
module ripple_redux(sum,a,b);
input [31:0] a, b;
output sum;
reg [32:0] sum;
reg carry;
integer i;
always @( a or b )
begin
carry = 0;
for(i=0; i<32; i=i+1) begin
sum[i] = a[i] ^ b[i] ^ carry;
carry = a[i] & b[i] | a[i] & carry | b[i] & carry;
end
sum[32] = carry;
end
endmodule
// :Example:
//
// A sequential ripple counter. It uses less hardware but is slower.
// (There is not much point in dividing an adder in to several cycles,
// but such an approach is used for multipliers.)
module ripple_redux_comb(sum,a,b,clk);
input [31:0] a, b;
input clk;
output sum;
reg [32:0] sum;
reg carry;
reg [4:0] i;
initial i = 0;
always @( posedge clk )
begin
if( i == 0 ) begin
sum[32] = carry;
carry = 0;
end
sum[i] = a[i] ^ b[i] ^ carry;
carry = a[i] & b[i] | a[i] & carry | b[i] & carry;
i = i + 1;
end
endmodule
////////////////////////////////////////////////////////////////////////////////
/// Miscellaneous Examples
// :Example:
//
// Clocked population count module. The correct output
// appears at most 32 clock cycles after the input. Other
// than counting cycles or knowing what the correct output should be,
// there is no way to tell that the
// output is ready.
module pop(p,a,clk);
input [31:0] a;
input clk;
output p;
reg [6:0] p;
reg [31:0] acopy;
reg [6:0] pcopy;
always @( posedge clk )
begin
if( acopy == 0 )
begin
p = pcopy;
pcopy = 0;
acopy = a;
end
else
begin
pcopy = pcopy + acopy[0];
acopy = acopy >> 1;
end
end
endmodule
// :Example:
//
// Population count with handshaking. Handshaking is the use of
// control signals between two modules to coordinate activities.
//
// In this case:
// The external module waits (if necessary) for ready to be 1.
// The external module then puts a number on "a" and asserts start.
// pop_with_handshaking_1 copies the number and sets ready to zero.
// When start goes to zero, pop_with_handshaking_1 starts computing.
// When pop_with_handshaking_1 is finished it asserts ready.
module pop_with_handshaking_1(p,ready,a,start,clk);
input [31:0] a;
input start, clk;
output p, ready;
reg [6:0] p;
reg ready;
reg [31:0] acopy;
always @( posedge clk )
begin
if( start )
begin
acopy = a;
p = 0;
ready = 0;
end
else if( !ready && acopy )
begin
p = p + acopy[0];
acopy = acopy >> 1;
end
else if( !ready && !acopy )
begin
ready = 1;
end
end
endmodule
/// Material below this point is under construction.
module text_to_binary(bin,valid,text,clk);
input [7:0] text;
input clk;
output bin, valid;
reg [31:0] bin;
reg valid;
always @( posedge clk )
begin
end
endmodule
// :Keyword: $stop (System task)
//
// Stops simulation. Used for testbenches and debugging.
module demo_counter();
wire [7:0] count;
reg up, reset, clk;
up_down_counter c1(count,up,reset,clk);
integer i;
initial
begin
i = 0;
up = 1;
reset = 1;
for(i=0; i<4; i=i+1) @( posedge clk );
reset = 0;
for(i=0; i<20; i=i-1)
begin
if( i != count )
begin
$display("Something wrong at i=%d, count=%d",i,count);
$stop;
end
@( posedge clk ); #1;
end
up = 0;
for(i=i; i>=0; i=i-1)
begin
if( i != count )
begin
$display("Something wrong at i=%d, count=%d",i,count);
$stop;
end
@( posedge clk ); #1;
end
$display("Done with tests.");
end
always begin clk = 0; #5; clk = 1; #5; end
endmodule